

报告器
Vitest 提供了几种内置报告器,以不同格式显示测试输出,以及使用自定义报告器的能力。你可以使用 --reporter 命令行选项,或者在你的 outputFile 配置选项 中加入 reporters 属性来选择不同的报告器。如果未指定报告器,Vitest 将根据运行环境 自动选择报告器。
通过命令行使用报告器:
npx vitest --reporter=verbose通过配置文件 vitest.config.ts 使用报告器:
import { defineConfig } from 'vitest/config'

export default defineConfig({
  test: {
    reporters: ['verbose'],
  },
})
某些报告器可以通过传递附加选项进行自定义。具体选项将在下面的章节中介绍。
export default defineConfig({
  test: {
    reporters: ['default', ['junit', { suiteName: 'UI tests' }]],
  },
})
默认配置
当未配置 reporters 时,Vitest 使用以下报告器:
- 在普通终端运行时使用
default - 当 Vitest 检测到 AI 编码智能体时使用
minimal - 当
process.env.GITHUB_ACTIONS === 'true'时会额外添加github-actions
如果你自行配置报告器列表,配置的列表会替换默认列表。如果想保留 Vitest 默认配置的同时添加报告器,请扩展 configDefaults.reporters:
import { configDefaults, defineConfig } from 'vitest/config'

export default defineConfig({
  test: {
    reporters: ['json', ...configDefaults.reporters],
  },
})
报告器输出
By default, Vitest's reporters print their output to the terminal. The json, junit and html reporters instead write to a scoped location under .vitest/:
jsonwrites.vitest/json/output.jsonjunitwrites.vitest/junit/output.xmlhtmlwrites.vitest/index.html
The json and junit locations can be overridden with the outputFile configuration option in your Vitest configuration file or via CLI. The html reporter uses its outputDir option instead.
npx vitest --reporter=json --outputFile=./test-output.jsonexport default defineConfig({
test: {
reporters: ['json'],
outputFile: './test-output.json',
},
})The json and junit reporters also accept outputFile as a reporter option, which takes precedence over the top-level outputFile:
export default defineConfig({
  test: {
    reporters: [['json', { outputFile: './test-output.json' }]],
  },
})
To print the report to the terminal instead of writing it to a file, set the stdout option on the json or junit reporter. This is ignored when outputFile is set:
export default defineConfig({
  test: {
    reporters: [['json', { stdout: true }]],
  },
})
注意
When stdout is enabled, the report can be interleaved with other output written directly to the terminal — for example process.stdout.write in a test file, or logs from the main process such as a global setup file — which can make the JSON or XML unparsable. Prefer the default file output when you need to consume the report programmatically.
组合报告器
你可以同时使用多个报告器,并以不同格式打印测试结果。
例如:
npx vitest --reporter=json --reporter=defaultimport { configDefaults, defineConfig } from 'vitest/config'
export default defineConfig({
test: {
reporters: ['json', ...configDefaults.reporters],
outputFile: './test-output.json'
},
})上面的示例将同时把测试结果以默认样式打印到终端,和以 JSON 格式写入指定的输出文件。
使用多个报告器时,还可以指定多个输出文件,如下所示:
export default defineConfig({
  test: {
    reporters: ['junit', 'json', 'verbose'],
    outputFile: {
      junit: './junit-report.xml',
      json: './json-report.json',
    },
  },
})
这个示例将编写单独的 JSON 和 XML 报告,并将详细报告打印到终端。
内置报告器
默认报告器
default 报告器会在底部显示当前运行中的测试摘要及其状态。某个测试套件一旦通过,其状态就会显示在摘要上方。
我们可以通过配置报告器来禁用摘要:
export default defineConfig({
  test: {
    reporters: [
      ['default', { summary: false }]
    ]
  },
})
项目中的测试输出示例:
 ✓ test/example-1.test.ts (5 tests | 1 skipped) 306ms
 ✓ test/example-2.test.ts (5 tests | 1 skipped) 307ms

 ❯ test/example-3.test.ts 3/5
 ❯ test/example-4.test.ts 1/5

 Test Files 2 passed (4)
      Tests 10 passed | 3 skipped (65)
   Start at 11:01:36
   Duration 2.00s
测试完成后的最终输出:
 ✓ test/example-1.test.ts (5 tests | 1 skipped) 306ms
 ✓ test/example-2.test.ts (5 tests | 1 skipped) 307ms
 ✓ test/example-3.test.ts (5 tests | 1 skipped) 307ms
 ✓ test/example-4.test.ts (5 tests | 1 skipped) 307ms

 Test Files  4 passed (4)
      Tests  16 passed | 4 skipped (20)
   Start at  12:34:32
   Duration  1.26s (transform 35ms, setup 1ms, collect 90ms, tests 1.47s, environment 0ms, prepare 267ms)
如果只有一个测试文件在运行,Vitest 会输出该文件完整的测试树,这类似于 树状报告器。如果文件中存在至少一个失败的测试,默认报告器同样会打印测试树。
✓ __tests__/file1.test.ts (2) 725ms
   ✓ first test file (2) 725ms
     ✓ 2 + 2 should equal 4
     ✓ 4 - 2 should equal 2

 Test Files  1 passed (1)
      Tests  2 passed (2)
   Start at  12:34:32
   Duration  1.26s (transform 35ms, setup 1ms, collect 90ms, tests 1.47s, environment 0ms, prepare 267ms)
详细报告器
详细报告器会在每个测试用例完成后打印出来。它不会单独报告套件或文件。如果启用了 --includeTaskLocation,它还会在输出中包含每个测试的位置。与 default 报告器类似,你可以通过配置报告器来禁用摘要。
除此之外,verbose 报告器会立即打印测试错误消息。完整的测试错误会在测试运行结束时报告。
这是唯一一个在测试未失败时报告 注释 的终端报告器。
npx vitest --reporter=verboseexport default defineConfig({
test: {
reporters: [
['verbose', { summary: false }]
]
},
})输出示例:
✓ __tests__/file1.test.ts > first test file > 2 + 2 should equal 4 1ms
✓ __tests__/file1.test.ts > first test file > 4 - 2 should equal 2 1ms
✓ __tests__/file2.test.ts > second test file > 1 + 1 should equal 2 1ms
✓ __tests__/file2.test.ts > second test file > 2 - 1 should equal 1 1ms

 Test Files  2 passed (2)
      Tests  4 passed (4)
   Start at  12:34:32
   Duration  1.26s (transform 35ms, setup 1ms, collect 90ms, tests 1.47s, environment 0ms, prepare 267ms)
一个带有 --includeTaskLocation 参数的示例:
✓ __tests__/file1.test.ts:2 > first test file > 2 + 2 should equal 4 1ms
✓ __tests__/file1.test.ts:3 > first test file > 4 - 2 should equal 2 1ms
✓ __tests__/file2.test.ts:2 > second test file > 1 + 1 should equal 2 1ms
✓ __tests__/file2.test.ts:3 > second test file > 2 - 1 should equal 1 1ms

 Test Files  2 passed (2)
      Tests  4 passed (4)
   Start at  12:34:32
   Duration  1.26s (transform 35ms, setup 1ms, collect 90ms, tests 1.47s, environment 0ms, prepare 267ms)
树状报告器
树状报告器与 default 报告器相同,但它还会在套件完成后显示每个单独的测试。与 default 报告器类似,你可以通过配置报告器来禁用摘要。
npx vitest --reporter=treeexport default defineConfig({
test: {
reporters: [
['tree', { summary: false }]
]
},
})使用默认 slowTestThreshold: 300 的情况下,测试进行中的示例输出:
 ✓ __tests__/example-1.test.ts (2) 725ms
   ✓ first test file (2) 725ms
     ✓ 2 + 2 should equal 4
     ✓ 4 - 2 should equal 2

 ❯ test/example-2.test.ts 3/5
   ↳ should run longer than three seconds 1.57s
 ❯ test/example-3.test.ts 1/5

 Test Files 2 passed (4)
      Tests 10 passed | 3 skipped (65)
   Start at 11:01:36
   Duration 2.00s
测试套件通过后的终端最终输出示例:
✓ __tests__/file1.test.ts (2) 725ms
   ✓ first test file (2) 725ms
     ✓ 2 + 2 should equal 4
     ✓ 4 - 2 should equal 2
✓ __tests__/file2.test.ts (2) 746ms
  ✓ second test file (2) 746ms
    ✓ 1 + 1 should equal 2
    ✓ 2 - 1 should equal 1

 Test Files  2 passed (2)
      Tests  4 passed (4)
   Start at  12:34:32
   Duration  1.26s (transform 35ms, setup 1ms, collect 90ms, tests 1.47s, environment 0ms, prepare 267ms)
Dot 报告器
每当一个测试完成时,就会打印一个点,以最小化输出量,同时让你看到所有执行过的测试。只有当测试失败时才会显示详细信息,并在最后提供套件的汇总。
npx vitest --reporter=dotexport default defineConfig({
test: {
reporters: ['dot'],
},
})测试套件通过后的终端最终输出示例:
....

 Test Files  2 passed (2)
      Tests  4 passed (4)
   Start at  12:34:32
   Duration  1.26s (transform 35ms, setup 1ms, collect 90ms, tests 1.47s, environment 0ms, prepare 267ms)
JUnit 报告器
以 JUnit XML 格式输出测试结果报告。 By default it is written to .vitest/junit/output.xml. To write it elsewhere, use the outputFile configuration option or the reporter's own outputFile option. To print it to the terminal instead, set the reporter's stdout option.
npx vitest --reporter=junitexport default defineConfig({
test: {
reporters: ['junit'],
},
})JUnit XML 报告示例:
<?xml version="1.0" encoding="UTF-8" ?>
<testsuites name="vitest tests" tests="2" failures="1" errors="0" time="0.503">
<testsuite name="__tests__/test-file-1.test.ts" timestamp="2023-10-19T17:41:58.580Z" hostname="My-Computer.local" tests="2" failures="1" errors="0" skipped="0" time="0.013">
<testcase classname="__tests__/test-file-1.test.ts" name="first test file > 2 + 2 should equal 4" time="0.01">
<failure message="expected 5 to be 4 // Object.is equality" type="AssertionError">
AssertionError: expected 5 to be 4 // Object.is equality
❯ __tests__/test-file-1.test.ts:20:28
</failure>
</testcase>
<testcase classname="__tests__/test-file-1.test.ts" name="first test file > 4 - 2 should equal 2" time="0">
</testcase>
</testsuite>
</testsuites>输出的 XML 包含嵌套的 testsuites → testsuite → testcase 标签。你可以通过以下选项自定义报告器的行为:
| 选项 | 描述 | 默认值 |
|---|---|---|
suiteName | <testsuites> 的 name 属性 | "vitest tests" |
suiteNameTemplate | <testsuite> 的 name 属性模板。接受带有占位符的字符串或函数。 | 相对文件路径 |
classnameTemplate | <testcase> 的 classname 属性模板。接受带有占位符的字符串或函数。 | 相对文件路径 |
titleTemplate | <testcase> 的 name 属性模板。接受带有占位符的字符串或函数。 | 包含祖先层级的完整测试标题 |
ancestorSeparator | 在 {classname} 占位符和默认测试标题中连接祖先描述块名称时使用的分隔符。 | " > " |
addFileAttribute | 为每个 <testcase> 添加 file 属性。 | false |
includeConsoleOutput | 包含 <system-out>/<system-err> 控制台输出。 | true |
stackTrace | 在 <failure> 元素中包含堆栈跟踪。 | true |
以下占位符可用于 suiteNameTemplate:
{title}– 第一个顶级describe块的名称;当没有顶级describe时回退到文件基本名{filename}– 从根目录开始的相对文件路径(例如src/foo.test.ts){filepath}– 绝对文件路径{basename}– 不带目录的文件名(例如foo.test.ts){displayName}– Vitest 项目名称
以下占位符可用于 classnameTemplate 和 titleTemplate:
{classname}– 由ancestorSeparator连接的祖先describe块名称(例如outer > inner){title}– 叶子测试标题(传递给it/test的字符串){suitename}– 顶级describe块名称,当测试没有封闭的describe时为空字符串{filename}– 从根目录开始的相对文件路径{filepath}– 绝对文件路径{basename}– 不带目录的文件名{displayName}– Vitest 项目名称
提示
{filename} 遵循 Vitest 的约定,解析为从项目根目录开始的 相对路径(例如 src/foo.test.ts)。这与 jest-junit 不同,在 jest-junit 中 {filename} 是纯文件名。使用 {basename} 来获取仅文件名。
export default defineConfig({
  test: {
    reporters: [
      ['junit', {
        suiteName: 'My Test Suite',
        // 使用第一个顶级 describe 块名称作为 testsuite 名称
        suiteNameTemplate: '{title}',
        // classname = 祖先 describe 链
        classnameTemplate: '{classname}',
        // name = 仅叶子测试标题(与 jest-junit 兼容)
        titleTemplate: '{title}',
        ancestorSeparator: ' > ',
      }]
    ]
  },
})
基于函数的模板接收所有可用变量,并可以返回任意字符串:
export default defineConfig({
  test: {
    reporters: [
      ['junit', {
        classnameTemplate: ({ classname, filename }) =>
          classname ? `${filename}::${classname}` : filename,
        titleTemplate: ({ suitename, title }) =>
          suitename ? `[${suitename}] ${title}` : title,
      }]
    ]
  },
})
输出的 XML 包含嵌套的 testsuites 和 testcase 标记。你可以使用环境变量 VITEST_JUNIT_SUITE_NAME 和 VITEST_JUNIT_CLASSNAME 分别配置它们的名称和类名属性。
JSON 报告器
Generates a report of the test results in a JSON format compatible with Jest's --json option. By default it is written to .vitest/json/output.json. To write it elsewhere, use the outputFile configuration option or the reporter's own outputFile option. To print it to the terminal instead, set the reporter's stdout option.
npx vitest --reporter=jsonexport default defineConfig({
test: {
reporters: ['json'],
},
})JSON 报告示例:
{
  "numTotalTestSuites": 4,
  "numPassedTestSuites": 2,
  "numFailedTestSuites": 1,
  "numPendingTestSuites": 1,
  "numTotalTests": 4,
  "numPassedTests": 1,
  "numFailedTests": 1,
  "numPendingTests": 1,
  "numTodoTests": 1,
  "startTime": 1697737019307,
  "success": false,
  "testResults": [
    {
      "assertionResults": [
        {
          "ancestorTitles": ["", "first test file"],
          "fullName": " first test file 2 + 2 should equal 4",
          "status": "failed",
          "title": "2 + 2 should equal 4",
          "duration": 9,
          "failureMessages": ["expected 5 to be 4 // Object.is equality"],
          "location": {
            "line": 20,
            "column": 28
          },
          "meta": {}
        }
      ],
      "startTime": 1697737019787,
      "endTime": 1697737019797,
      "status": "failed",
      "message": "",
      "name": "/root-directory/__tests__/test-file-1.test.ts"
    }
  ],
  "coverageMap": {}
}
说明
自 Vitest 3 起,如果启用了代码覆盖率功能,JSON 报告器会在 coverageMap 中包含覆盖率信息。
每个断言结果中的 meta 字段可以通过 filterMeta 报告器选项进行过滤。它接收每个字段的键和值,并应返回 false 以便将该字段从报告中排除:
export default defineConfig({
  test: {
    reporters: [
      ['json', {
        filterMeta: (key, value) => key !== 'internalField',
      }]
    ]
  },
})
HTML 报告器
生成 HTML 文件,通过交互式 GUI 查看测试结果。文件生成后,Vitest 将保持本地开发服务器运行,并提供一个链接,以便在浏览器中查看报告。
报告产物的根目录可以通过报告器的 outputDir 选项指定。报告入口文件会被写入 <outputDir>/index.html,UI 资源文件则位于 <outputDir>/ui/ 下。默认情况下,outputDir 是 .vitest,即 Vitest 共享的产物目录,因此附件(.vitest/attachments)和覆盖率(.vitest/coverage)会被直接复用,而是复制一份。
npx vitest --reporter=htmlexport default defineConfig({
test: {
reporters: ['html'],
},
})设置 singleFile 以生成自包含的 HTML 报告:
export default defineConfig({
  test: {
    reporters: [
      ['html', { singleFile: true }],
    ],
  },
})
当启用 singleFile 时,Vitest 会将 UI 资源、元数据和测试附件内联到一个单一的自包含 index.html 文件中。这样一来,报告就更易于分享、上传或下载,而不必保留整个 html 输出目录。
注意
singleFile 有两个注意事项:
- 由于所有内容都会以内联方式嵌入,文件体积可能会变得非常大,打开速度较慢、内存占用较高,也可能超出某些产物查看器或静态托管服务的大小限制。
- 覆盖率 HTML 报告目前不会被内联,仍作为独立文件形式保留。
当测试套件包含许多或大型附件,或者你需要将覆盖率包含在包中时,建议优先使用默认的多文件报告。
提示
该报告器需要安装 @vitest/ui。
TAP 报告器
按照 Test Anything Protocol (TAP)输出报告。
npx vitest --reporter=tapexport default defineConfig({
test: {
reporters: ['tap'],
},
})TAP 报告示例:
TAP version 13
1..1
not ok 1 - __tests__/test-file-1.test.ts # time=14.00ms {
    1..1
    not ok 1 - first test file # time=13.00ms {
        1..2
        not ok 1 - 2 + 2 should equal 4 # time=11.00ms
            ---
            error:
                name: "AssertionError"
                message: "expected 5 to be 4 // Object.is equality"
            at: "/root-directory/__tests__/test-file-1.test.ts:20:28"
            actual: "5"
            expected: "4"
            ...
        ok 2 - 4 - 2 should equal 2 # time=1.00ms
    }
}
TAP 扁平报告器
输出 TAP 扁平报告。与 TAP Reporter 一样,测试结果的格式遵循 TAP 标准,但测试套件的格式是扁平列表,而不是嵌套层次结构。
npx vitest --reporter=tap-flatexport default defineConfig({
test: {
reporters: ['tap-flat'],
},
})TAP 扁平报告示例:
TAP version 13
1..2
not ok 1 - __tests__/test-file-1.test.ts > first test file > 2 + 2 should equal 4 # time=11.00ms
    ---
    error:
        name: "AssertionError"
        message: "expected 5 to be 4 // Object.is equality"
    at: "/root-directory/__tests__/test-file-1.test.ts:20:28"
    actual: "5"
    expected: "4"
    ...
ok 2 - __tests__/test-file-1.test.ts > first test file > 4 - 2 should equal 2 # time=0.00ms
Hanging process 报告器
展示任何妨碍 Vitest 安全退出的 hanging processes ,hanging-process 报告器本身不显示测试结果,但可与其他报告器结合使用,以便在测试运行时监控进程。使用这个报告器可能会消耗大量资源,因此通常应保留用于在 Vitest 无法正常退出进程的情况下进行调试的目的。
npx vitest --reporter=hanging-processexport default defineConfig({
test: {
reporters: ['hanging-process'],
},
})GitHub Actions 报告器
输出 工作流命令 为测试失败提供注释。当 process.env.GITHUB_ACTIONS === 'true' 时(在 GitHub Actions 环境中),此报告器会 自动启用。
你可以使用 onWritePath 选项自定义在 GitHub 的注释命令格式 中打印的文件路径。适用于在容器化环境(如 Docker)中运行 Vitest,因为容器内的文件路径可能与 GitHub Actions 环境中的路径不一致。
export default defineConfig({
  test: {
    reporters: process.env.GITHUB_ACTIONS === 'true'
      ? [
          'default',
          ['github-actions', { onWritePath(path) {
            return path.replace(/^\/app\//, `${process.env.GITHUB_WORKSPACE}/`)
          } }],
        ]
      : ['default'],
  },
})
如果你正在使用 Annotations API,报告器会将这些注释内联显示在 GitHub UI 界面中。你可以通过设置 displayAnnotations 为 false 将功能禁用:
export default defineConfig({
test: {
reporters: [
['github-actions', { displayAnnotations: false }],
],
},
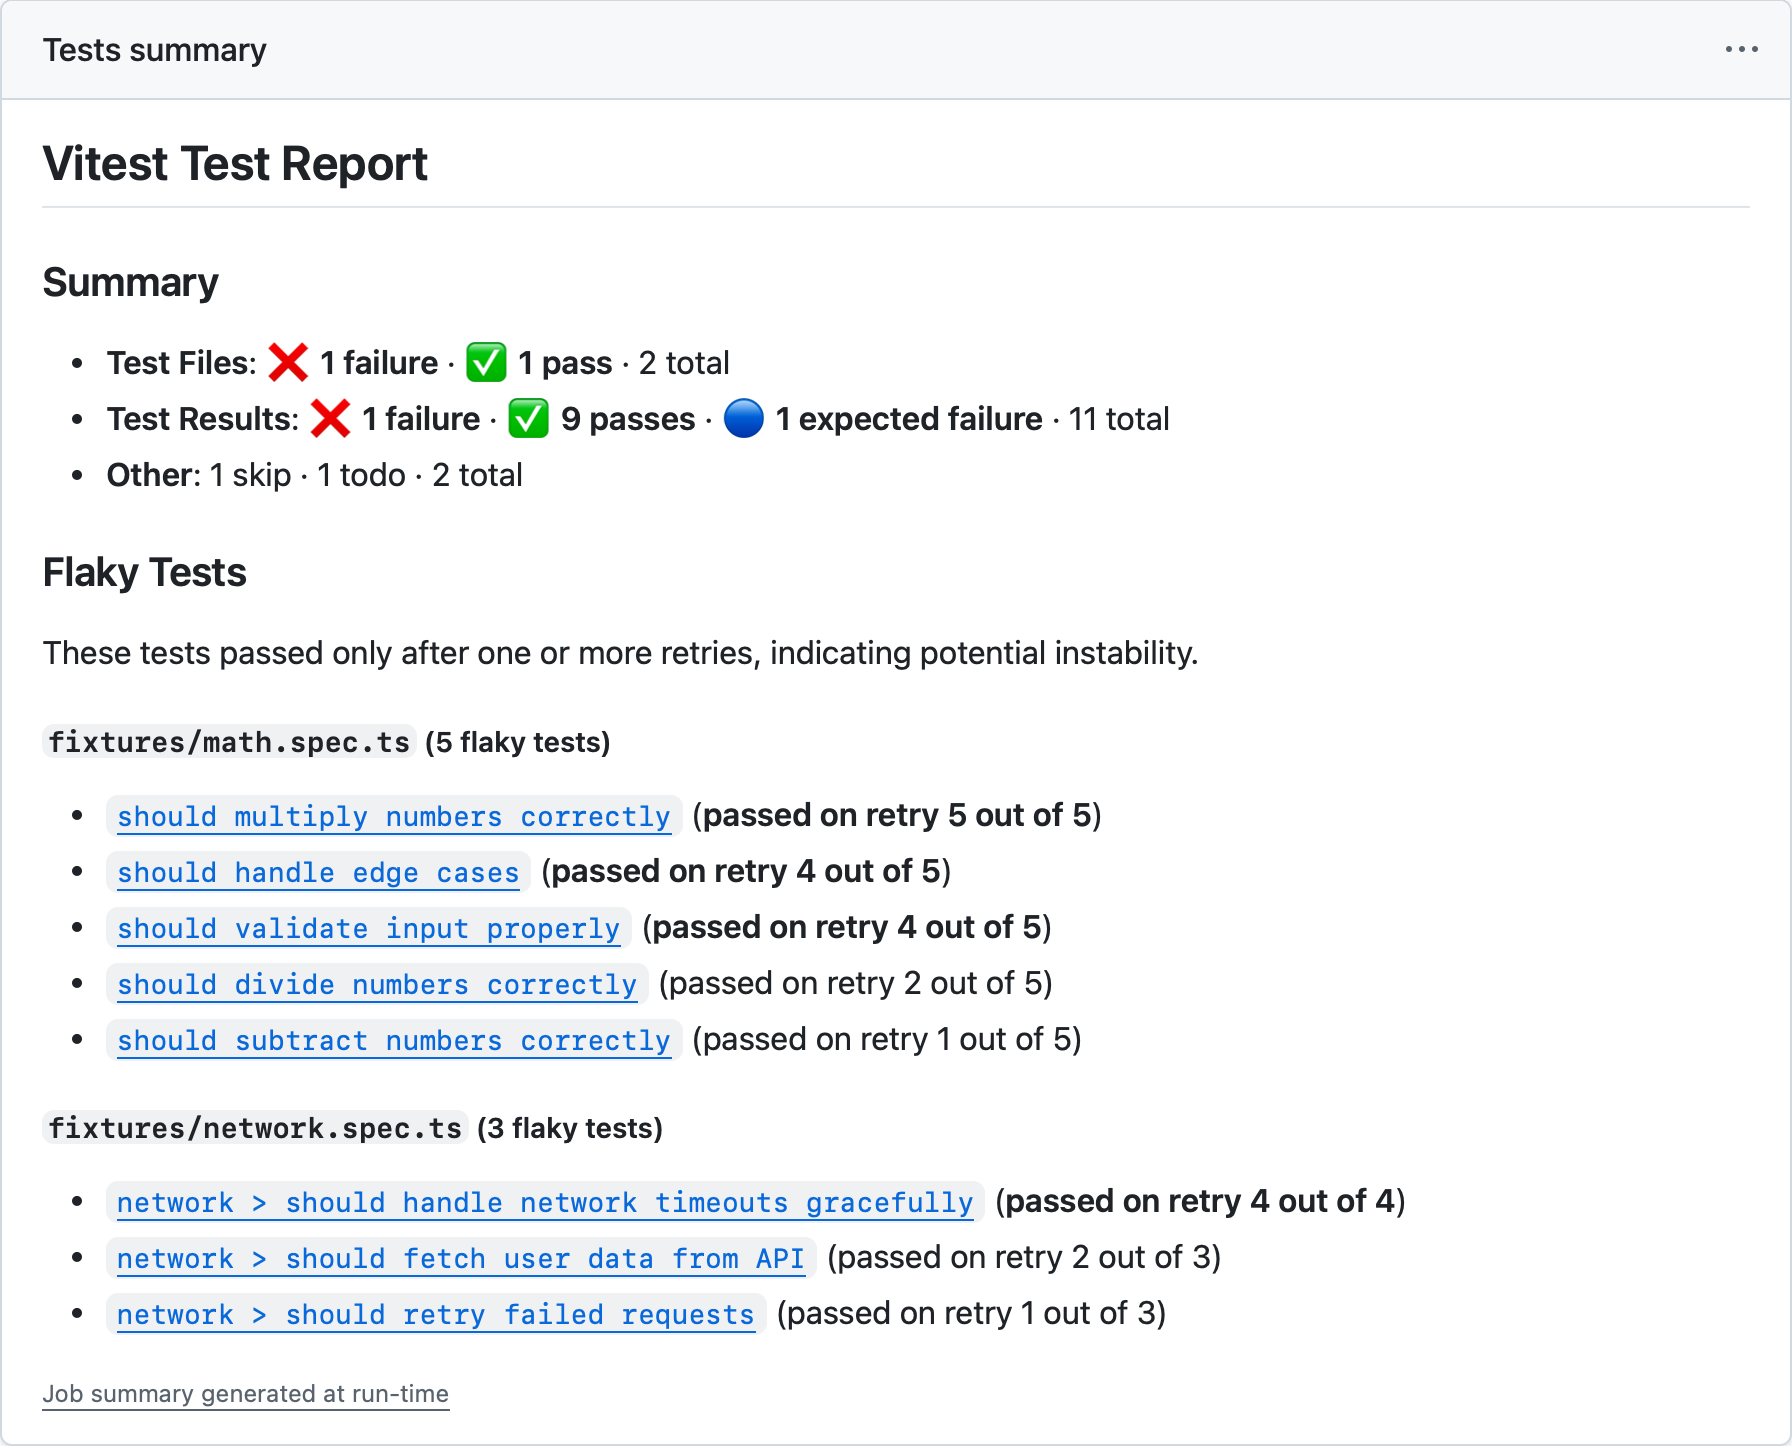
})GitHub Actions 报告器会自动生成一个 作业摘要,其中包含你的测试结果概览。该摘要包括测试文件和测试用例的统计数据,并突出显示需要重试的测试。

作业摘要默认启用,并写入 $GITHUB_STEP_SUMMARY 指定的路径。你可以使用 jobSummary.outputPath 选项来覆盖它:
export default defineConfig({
  test: {
    reporters: [
      ['github-actions', {
        jobSummary: {
          outputPath: '/home/runner/jobs/summary/step',
        },
      }],
    ],
  },
})
要禁用作业摘要:
export default defineConfig({
  test: {
    reporters: [
      ['github-actions', { jobSummary: { enabled: false } }],
    ],
  },
})
摘要中的容易失败测试部分会包含永久 URL 链接,可将测试名称直接链接到 GitHub 上对应的源码行。这些链接会利用 GitHubActions 提供的环境变量($GITHUB_REPOSITORY、$GITHUB_SHA 和 $GITHUB_WORKSPACE)自动生成,因此在大多数情况下无需额外配置。
如果你需要覆盖这些值:例如,在容器或自定义环境中运行时——可以通过 fileLinks 选项进行自定义:
repository:GitHub 仓库,格式为owner/repo。默认为process.env.GITHUB_REPOSITORY。commitHash:用于永久链接 URL 的提交 SHA。默认为process.env.GITHUB_SHA。workspacePath:磁盘上仓库根目录的绝对路径。用于计算永久链接 URL 的相对文件路径。默认为process.env.GITHUB_WORKSPACE。
这三个值都必填可用才能生成链接。
export default defineConfig({
  test: {
    reporters: [
      ['github-actions', {
        jobSummary: {
          fileLinks: {
            repository: 'owner/repo',
            commitHash: 'abcdefg',
            workspacePath: '/home/runner/work/repo/',
          },
        },
      }],
    ],
  },
})
精简报告器
- 别名:
agent
输出一份精简报告,只包含失败的测试及其错误信息。通过测试的控制台日志和摘要部分也会被一并隐藏。
智能体报告器
此报告器针对 AI 编程助手和基于 LLM 的工作流程进行了优化,以减少词元使用量。当 Vitest 检测到它在 AI 智能体编程内部运行时,它会 自动启用。
npx vitest --reporter=minimalexport default defineConfig({
test: {
reporters: ['minimal']
},
})Blob 报告器
将测试结果存储在计算机上,以便以后可以使用 --merge-reports 命令进行合并。 默认情况下,将所有结果存储在 .vitest/blob/ 文件夹中,但可以用 --outputFile 或 --outputFile.blob 参数覆盖。
npx vitest --reporter=blob --outputFile=reports/blob-1.json如果你在不同的机器上使用 --shard 参数运行 Vitest,或者跨多个环境(例如,linux/macos/windows)运行,我们建议使用此报告器。所有 blob 报告都可以在 CI 流水线结束时使用 --merge-reports 命令合并到任何报告中:
npx vitest --merge-reports=reports --reporter=json --reporter=default在多个环境中运行相同的测试时,使用 VITEST_BLOB_LABEL 环境变量来区分每个环境的 blob。Vitest 在合并时读取标签并分别显示结果:
VITEST_BLOB_LABEL=linux vitest run --reporter=blob你也可以通过 blob 报告器参数传递标签。这比 VITEST_BLOB_LABEL 具有更高的优先级。
import { defineConfig } from 'vitest/config'

export default defineConfig({
  test: {
    reporters: [
      ['blob', { label: 'linux' }],
    ],
  },
})
Blob 报告器输出不包含基于文件的 附件。 在使用此功能时,请确保在 CI 中合并 blob 报告的同时,一并处理 attachmentsDir。
提示
--reporter=blob 和 --merge-reports 这两个选项在监听模式下均不可用。
自定义报告器
你可以使用从 NPM 安装的第三方自定义报告器,方法是在 reporter 选项中指定它们的软件包名称:
npx vitest --reporter=some-published-vitest-reporterexport default defineConfig({
test: {
reporters: ['some-published-vitest-reporter'],
},
})此外,你还可以定义自己的 自定义报告器,并通过指定文件路径来使用它们:
npx vitest --reporter=./path/to/reporter.ts自定义报告器应实现 报告器接口。